
Every so often a site’s Cloudflare zone can expire — and when it does, your PBN LTD dashboard now spots it and lets you put it right in a single click. This is normal cloudflare behaviour if the nameservers are not pointing to the created zone within 28 days.
There’s a new Create a new zone button that rebuilds everything for you: all your DNS records, all your settings, and a fresh set of nameservers. Here’s what an expired zone looks like and exactly how to reinstate it.
💡 The short version: if you see a “Cloudflare zone expired” notice, click Create a new zone — or just open the site and let it rebuild automatically — then copy the new nameservers into your domain registrar. That’s it.
🔎 What does “Cloudflare zone expired” mean?
When a site is set up on Cloudflare, you have a window to point your domain’s nameservers to the ones we give you. If they aren’t pointed within Cloudflare’s 28-day window, Cloudflare automatically removes — or “expires” — the zone. This is standard Cloudflare behaviour. Once it happens, the old nameservers stop working and the site can sit on “Waiting DNS update.”
The good news: your dashboard now detects this for you and turns fixing it into a one-click job — and nothing is lost in the process.
🔔 You’ll see a clear notice
As soon as a zone expires, you’ll see a clear notice on the site’s overview page. In most cases we start rebuilding the zone for you automatically the moment you open the site or log in — so often you can simply refresh after a minute:
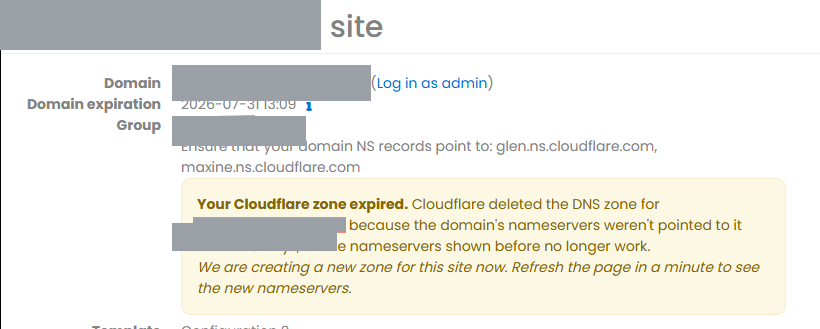
From your main dashboard, the same site shows a Cloudflare zone expired tag alongside a one-click Create a new zone button:

🔧 Create the new zone
Click Create a new zone (or simply let it rebuild automatically). Your zone is rebuilt straight away, with all of your existing DNS records and settings carried over — you don’t need to re-enter anything. It simply re-creates are original Cloudflare Zone again. So you don’t need to delete or reinstall and domain to reinstate the zone.
🌐 Set your new nameservers
Once the new zone is ready, your dashboard shows your new nameservers, each with a handy Copy button:
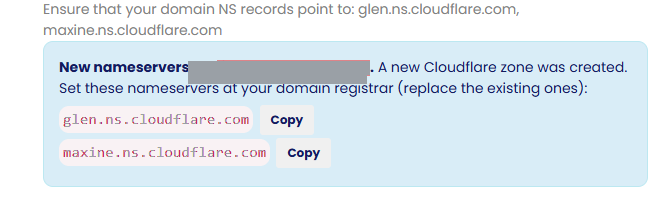
Copy each nameserver and set them at your domain registrar, replacing the existing ones. Once your registrar points to the new nameservers, the site moves off “Waiting DNS update” and goes live again.
📌 Heads-up: point your nameservers promptly so the new zone doesn’t expire again. If your domain is at Namecheap or Porkbun (or registered through Zinn Digital), you can connect it and we’ll keep the nameservers updated for you automatically.
✅ Nothing is lost. Creating a new zone rebuilds your DNS records and settings exactly as they were — you’re simply getting a fresh, working zone and up-to-date nameservers.